Monday, July 4, 2011

happy 4th of july!

happy 4th of july everyone! if you live in the US, wave your flags with pride! If you live elsewhere, wave the US flag with pride. If you don't have a US flag, simply acknowledge that yes, today is July 4th, the fourth of July, the day before July 5th, what of it?, and get on with your day.
Now, if you live in the US chances are you're going to a July 4th bash and if you're not, you should be. Which is why I created this whole Independence Day Party Guide for you. You're welcome.

Outfit:
Show your pride!
Food:

 
More food, to throw at people not wearing red, white and blue:
Courtesy of here

And of course, decorations:

From CountryLiving
As for me, well, I'm going to a bbq. Most likely no american flag mini pies, sadly....I'm not wearing red, white and blue either. Instead I'm going for a white-coral-navy look. Rulebreaker.

And don't forget to watch the fireworks!

found here
happy fourth again!
<3 Maggie

Sunday, July 3, 2011

(re)design your summer: bandanna bow bracelet!

Try saying that five times fast.

For my fellow U.S. citizens, this project can also work as a 4th of July project. For the out-of-country readers-make one anyway! They're fun, and not all bandannas are red and navy.

I have a large supply of bandannas from various events--prairie-themed dances, school events where they wanted to keep track of us, camps....I probably have about four or five lonely bandannas wasting away in my scrap bag. And I knew I was never going to wear them unless another square dance rolled around (which I sincerely hope it does not). Soooo.....in seeing all the gorgeous bow bracelets on the market, I decided to make my own! And now I don't have to buy these shoes to be patriotic:
Designed for Betsey Johnson here, not sure where you can buy them though.....
Yeah, I think my bracelet does the trick unless you are extremely patriotic or a hipster. If you are a hipster can I borrow your moody scarves sometime? 
 Anyway, on to the tutorial!

Stuff You'll Need
-two bandannas, different colors
-scissors


That's it! One bandanna makes a LOT of bracelets so that's your Christmas presents covered and it's only July. Aren't I efficient?
1. Make sure the bandanna wraps around your wrist. If it does cut three skinny strips out of one and braid them. If it does not cut out six skinny strips and join each strip together so there are three. Then braid them. And so on. This can also work as a belt.
2. Cut a medium-sized rectangle out of your second bandanna, depending on how large you want the bow to be. Cut another strip of your first bandanna and use it to tie the rectangle to the braid, bunching the rectangle in the middle to create a bow effect. Tie the ends of the braid together and wear! Bandannas are fairly stretchy but if you're concerned about getting your bracelet off again make sure you can untie your knot!
3. Make a splash! This is not a bracelet to be ignored.

Happy (early) 4th of July everyone!

<3 Maggie

Saturday, July 2, 2011

a star is born

Hey everyone! How's summer treating you? It better be treating you well. Abusive relationships are never good. But, you know, if you need to talk it out with someone, I'm right here.
Do you need a vacation from your vacation?
Do you sometimes feel disappointed in yourself for not being able to shoot pillows out of your forearms? Do you wish you were a superhero minus the ridiculous long johns?
Well, I have just the thing for you! Although pillow-shooting superpowers are not guaranteed, these fabulous fingerless gloves will leave you feeling like a superhero! Below, modeling the only pair currently in existence (made by me anyway), is supermodel* AM. They were custom-made for just for her as it was the world-famous model's birthday a few days ago.
I did use a pattern for these, but it has vanished from my list of bookmarks. The invisible blog. Another simple pattern for fingerless gloves can be found here.
Below, behold AM's extreme modeling skills at our glamorous photo shoot!

Pose #1: I'm Not Flipping You Off, I Swear

Pose #2: I Can Shoot Pillows Out Of My Fists

Pose #3: Seeeeee? Magic!

Pose #4: Fourth Glass Of Wine.....Or Was It Fifth?

Pose #6: The Glamorous

Pose #7: WHAT did you say?

Pose #8: She May Look Dead, But She's Just Pretending

Pose #9: The Murderous Glare

Pose #10: DID SOMEBODY SAY CANDYYYYYYYYY?


Pose #11: The Sideways Frenchman

 The expanse of blue behind her is not, as you probably thought, the ocean. It is my room. I know, I am a girl obsessed.
*I can feel AM giving me a murderous glare through the computer. I'm just that psychic. Told you you should be a model!**
**If you didn't understand that, it's ok. Inside joke. Do you feel excluded yet?***
***I'm going to sign off before these stars get out of control.****
****Ok?*****
*****You still there?*******
********Are you still reading this?*******
*******Um, ok then. Bye.********
********That really hurt my feelings.*********
*********Oh, there you are. I feel much better now.**********
**********Thanks for not deserting me.
<3 Maggie

Friday, July 1, 2011

fun with polyvore: 1 piece, 4 ways

 First off, sorry for the lack of posts. I was busy knitting a friend's gift (Knitting gifts, what next? Bingo? I'm not that old, you know!). Pics are coming soon of that--I promise it's not something your grandma would wear unless you have a really cool grandma.
Anyway.
You've probably seen these kind of articles in fashion magazines or desperate stores that REALLY WANT YOU TO BUY THIS FABULOUS DRESS LOOK YOU CAN WEAR IT 4 TIMES WOW. Or maybe I just read weird stuff. Anyway, I was messing around on Polyvore and decided to do a 1-piece-4-ways kind of thing here!
1-piece-4-ways basically shows you how to wear an article of clothing like a dress or skirt 4 ways. Big whoop, yet surprisingly fun. It's a great way to pass the time on bus rides, airplanes, or in waiting rooms. So here we go!

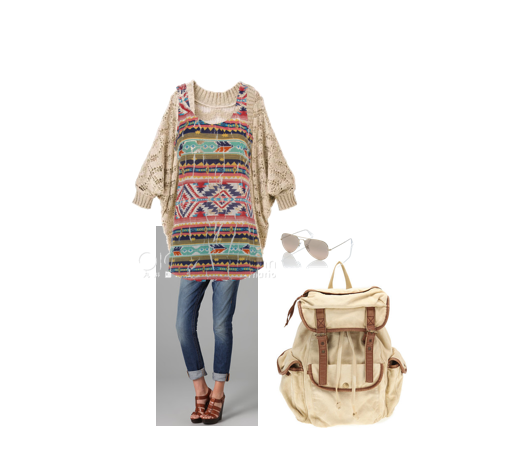
Piece #1: Boyfriend Jeans
I really want a pair of boyfriend jeans. This is my way of justifying to myself that they're a good purchase. :P
Outfit #1--Have Jeans, Will Travel. Of course I name my polyvore outfits. It's the best part!

Outfit #2--New Kid on the (color)Block

Outfit #3--laid-back living

Outfit #4--His and Hers
Did you enjoy my cheesy titles? I think they'd be great on an ad somewhere.
Hope you enjoyed! Be warned, though--Polyvore is a major time-suck. It eats your hours until there is no time left in your day and you wonder, what did I do today? Oh yeah, I made virtual outfits.
Have fun!
<3 Maggie

**ooh and note: happy first day of July everyone!!!!!**

Sunday, June 26, 2011

mini-project: scrapbuster!

Hi!
A few days ago I was forced to clean my room. Horrible, I know. But in the midst of cleaning I realized just how many fabric scraps I have floating around that I utterly refuse to get rid of because they're pretty, yet I don't know what to do with them. After I was done cleaning I messed my room up again by reading a magazine and leaving it precariously balanced on a shelf where it knocked over some origami and....you get the picture.
But the magazine, silly as it was, had given me an idea.
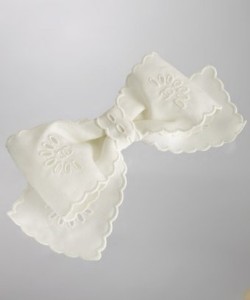
Bow clips.
If you are a girly-girl like me these are the equivalent of gumdrops--sweet, unique and fun to put on gingerbread houses (well, maybe not). If you're a hipster wear them ironically. If you're punk use skull print. And if you're a hardcore nerd use them to decorate your pocket protecter. The uses for the amazing bow barrette are endless--like a plain barrette, only better. 
Some examples below:
All via Forever 21--so cheap it probably costs more to DIY, yet a rabid 12 year old grabbed the last set so I had no choice. ;)


And now some more pricey options just so I have bragging rights:

This little Chanel beauty will set you back $460. And yes, it's a hairclip. I don't even want to imagine what the shoes must cost. 

So you get the idea, right? Onward!

Stuff you'll need:
-bobby pins or clips
-little scraps of fabric long enough to tie in a bow
-hot glue gun

That's it! This project takes about 5 seconds, I promise.

1. Tie little scraps of fabric in a bow. If it's not long enough, tie in a knot and fold the ends under. Hot-glue ends to knot (this creates a prettier bow).
2. Hot-glue bows to bobby pins.
3. Wear. Say "In your face Chanel! I just saved $460!"
4. Say to parents "I just saved $460 by being crafty. Can I have that laptop now?" If it doesn't work, don't blame me.
PICTURE TIME!

These look too delicious for words except for the fact that I hate marshmallows.
Sorry....distracting desserts.....


Please do not wear all of your happy clips at the same time. They get jealous of each other. I only did this so I didn't have to take three photos :P

sidenote: I just discovered this nifty thing called labels. I'm going to use it from now on. I feel like everybody but me knows what it does but hey, can't hurt right? Unless it helps creepers find my personal info. That would be bad. It probably doesn't, though. I don't know any creepers that like hot glue guns.

That my friends is a scary peek inside my mind.

<3 Maggie

Thursday, June 23, 2011

(re)design your summer: lady in lace

What's up? Long time no post! Sorry about that. I wish I could say I was doing something important (ya know, off in some glamorous place like Costa Rica or New York....) but sadly not. I did see the ACJ sandwich. We had big fun. I also managed to spend about $50 on yarn.

I have an announcement to make (I'm not pregnant). This whole (re)design your summer thing--it's turning into an all-summer thing. I'm really confused about the week (when did it start? When should it end?). So a month or a couple is easier to do :)

I do have a project for y'all, though. I wasn't being totally unproductive!
If you're like me you have a couple pairs of sad, forgotten Converse at the back of your closet. The plain ones you had to buy when your shoes literally fell off your feet or you were doing something like wading through quicksand but you showed up in high heels....know what I'm talking about? No? Moving on. If you're also like me, you forgot you already had Converse and bought more. Now you have an army of solid covered Converse that is taking over your dreams and screaming "WASTEFULNESS!" in your face when you're trying to get some sleep. Long story short, here's how to spice up some plain canvas sneakers to give them a delicate, feminine touch!

Stuff You'll Need
-canvas sneakers (drugstores sell them for like $7 if you don't have any....it would kinda defeat the eco-purpose but I understand. This redo is cute)
-a yard of lace trim--I got mine at Joann's when I was on my yarn spree
-hot glue gun
-scissors
-Shoelaces that aren't a gross used shoe shade of grayish white like mine are. White lace only serves to highlight the dirtiness of your shoelaces, I've discovered.
That's it! Lets get this party started. I'm in a cheesy mood today, I know.

1. Unlace your shoes. Put laces off to the side where they can't mangle your glue-gun cord.
2. If you are of the perfectionist genre, you can pin your lace trim to the shoe tongue and get a more accurate piece that way, if you are impatient like me: hold the trim to the tongue as best you can and cut around the edges so you generally have enough lace to cover it. Bigger is better. Don't worry about your edges: you can glue them to the bottom side of the tongue if they're jagged.
3. Glue your big rectangle of lace to the shoe tongue. You will need something besides your fingers to prod the lace into position/squish it into the glue as hot glue seeps through the holes and burns your fingers.

 4. Next, take your lace and lay it on the side of your shoe. Cut a piece to match the piece of canvas, all the way to the back strip and right below the stitching. I'm not going to cover the shoelace holes because it would be too difficult to cut around them. Glue your strip down.

5.  Repeat on the other side and cut a piece of trim for the back strip. Glue down. Repeat steps 1-4 on other shoe.
6. Find a good pair of laces or improvise (what do you guys think of the twine? I'm not crazy about it....magenta or coral ribbon might be better. Comments are welcome!)
7. Admire. Wear. Feel that much fancier because you're wearing lace. But don't try to lunch with society ladies. They will eat you and your homemade shoes alive.

Another option for this project would be to use black or colored lace! Mesh! The possibilities are endless....
<3 Maggie

Sunday, June 19, 2011

happy father's day! (and a redesign project)

I just want to take this moment to shamelessly praise my wonderful dad. He's always been there for me from toddler to now, with a kind word or funny song when I need it! I always enjoy art classes with him and going to the local farmer's market on Sundays. He's put on a patient face at the arsenal of confusing (for guys) cleansers, moisturizers, toners, shampoos, sprays, and cosmetics I employ and the weird outfits I tend to wear. He has no idea how much he means to me.
I love you, Dad. Thanks for being the best!

Now, following with the dad-lovefest, why don't we take this moment to steal all his musty old spare buttons?
You know the type. The ones your grandma hoarded, or spare ones that came with your new shirt, or ones that you have absolutely no idea how they landed on your desk but they're cluttering it up and your OCD is going insane (anybody else like that? No? Then it's just me.). Now I have a project for you to use up all those pesky madness-inducing spare buttons!
The button bracelet.
Found in the crafts stalls of farmers markets or chic vintage stores, I've always been obsessed with the eclectic button bracelet. It adds a vintage, chic edge to any outfit which I always love  (then again I have a love of all things vintage), and it's way easy to make!

Stuff you'll need:

-Old buttons--a range of sizes and colors for interest
-elastic bracelet cord, the kind that comes in bead kits is fine
-scissors

That's it! Let's get started.

1. Arrange your buttons beforehand in the order you want them to appear on your bracelet so you don't go scrambling all over for buttons. Try to vary the sizes and colors for a more carefree look.
 2. Cut a piece of clear elastic long enough to wrap around your wrist twice. Tie a knot at the end and begin weaving the other end through the buttonholes, alternating between the two top ones and two bottom ones.
 4. When you've reached the end of your buttons, try on! Make any adjustments (more buttons, less buttons) and then triple-knot the ends together to secure. Cut off any loose ends and wear!


5. Prance your chic little self around town. Show off your new bracelet.
<3 Maggie